이 글은 학습 목적으로 작성되었으며 Spring Framework의 기능을 모방하여 구현되었습니다.
따라서 실제 Spring Framework와 똑같이 구현되지는 않습니다.
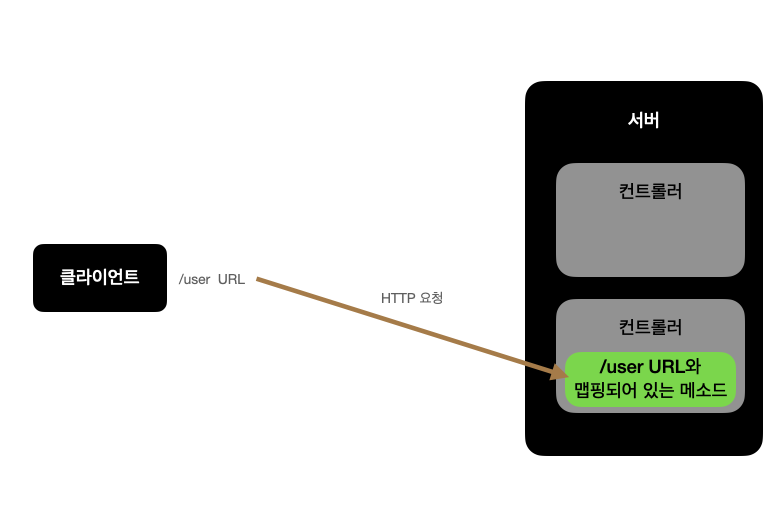
1. 개요
다음으로 주석과 RequestMapping에 대해 자세히 살펴보겠습니다.
Spring의 RequestMapping 어노테이션은 메소드뿐만 아니라 클래스에도 적용할 수 있으므로 보다 유연한 구조를 가지고 있습니다.
또한 요청 URL 외에 HTTP 요청 메서드 정보를 활용하여 보다 세분화된 매핑을 구성할 수 있습니다.
2. 사전 작업
2.1 쓰기 RequestMethod 열거형 유형
public enum RequestMethod {
    GET, POST
}
HTTP 요청 메서드에 대한 Enum 클래스를 만듭니다.
2.2 주석
@Target({ElementType.TYPE, ElementType.METHOD}) // RequestMapping 어노테이션은 클래스와 메서드 두곳에서 사용될 것입니다.
@Retention(RetentionPolicy.RUNTIME) // 리플렉션을 이용해 런타임에 어노테이션 정보를 가져올 것 입니다.
public @interface RequestMapping {

    String path() default "";

    RequestMethod method() default RequestMethod.GET; // 요청 HTTP 응답의 정보도 활용할 것입니다.

}
RequestMapping 주석에는 다음 정보가 포함됩니다.
- 매핑할 URL에 대한 정보
- 매핑할 HTTP 요청 메서드에 대한 정보
2.3 컨트롤러 작성
public interface Controller {
}
@RequestMapping(path = "/user") // UserController 을 "/user"으로 시작하는 URL과 맵핑할 것입니다.
public class UserController implements Controller{

    @RequestMapping(path = "/create") // "/user/create" URL 과 GET 요청에 맵핑할 것입니다.
    public void createByGet() {
        System.out.println("I am user create method by GET");
    }

    @RequestMapping(path = "/create", method = RequestMethod.POST) // "/user/create" URL 과 POST 요청에 맵핑할 것입니다.
    public void createByPost() {
        System.out.println("I am user create method by POST");
    }

}
@RequestMapping(path = "/article") // ArticleController 을 "/article"으로 시작하는 URL과 맵핑할 것입니다.
public class ArticleController implements Controller{
    @RequestMapping(path = "/create") // "/article/create" URL 과 GET 요청에 맵핑할 것입니다.
    public void createByGet() {
        System.out.println("I am article create method by GET");
    }

    @RequestMapping(path = "/create", method = RequestMethod.POST) // "/article/create" URL 과 POST 요청에 맵핑할 것입니다.
    public void createByPost() {
        System.out.println("I am article create method by POST");
    }
}
위에서 작성한 주석은 각 클래스와 메소드에 적용되었습니다.
3. 코드 구현
public class Main {
    public static void main(String() args) throws InvocationTargetException, IllegalAccessException {

        //=============초기화 단계================

        // 1. Request-Line은 "POST /user/create"라고 가정합니다.
        String request = "POST /user/create";
        String() methodAndURL= request.split(" ");
        String method = methodAndURL(0);
        String URL = methodAndURL(1);

        // 2. String 타입의 HTTP 요청 메소드를  RequestMethod 타입으로 변환합니다.
        RequestMethod requestMethod = null;
        if (method.equals("GET")) {
            requestMethod = RequestMethod.GET;
        }
        if (method.equals("POST")) {
            requestMethod = RequestMethod.POST;
        }

        // 3. 콜렉션 인터페이스 controllers에 UserController 타입과 ArticleController 타입이 있다고 가정합니다.
        Collection<Controller> controllers = new ArrayList<>();
        controllers.add(new UserController());
        controllers.add(new ArticleController());

        //=============================================

        // 1. 요청 URL을 처리할 수 있는 Controller를 찾는다.

        Controller mappingController = null;
        String mappingControllerPath = null;
        for (Controller controller : controllers) {

            // 1.1 클래스 파일에 대한 정보를 가져온다. (리플렉션 사용)
            Class<? extends Controller> controllerClass = controller.getClass();

            // 1.2 유저 클래스의 RequestMapping 어노테이션을 가져온다.
            RequestMapping controllerRequestMapping = controllerClass.getAnnotation(RequestMapping.class);

            // 1.3 RequestMapping 에 맵핑되어 있는 경로를 가져온다.
            String controllerPath = controllerRequestMapping.path();

            // 1.4  컨트롤이 URL을 처리할 수 있는지 확인한다.
            if (URL.startsWith(controllerPath)) {
                mappingController = controller;
                mappingControllerPath = controllerPath;
                break;
            }
        }

        // 2. 요청 URL과 HTTP method를 처리할 수 있는 메소드를 찾는다.

        // 2.1 클래스 파일에 대한 정보를 가져온다. (리플렉션 사용)
        Class<? extends Controller> controllerClass = mappingController.getClass();

        // 2.2 클래스의 모든 메소드를 가져온다.
        Method() methods = controllerClass.getMethods();

        Method mappingMethod = null;
        for (Method m : methods) {

            // 2.3 메소드의 RequestMapping 어노테이션을 가져온다.
            RequestMapping methodAnnotation = m.getAnnotation(RequestMapping.class);

            // 2.4 메소드가 요청 HTTP method를 처리할 수 있는지 확인한다.
            if (methodAnnotation.method() != requestMethod) {
                continue;
            }

            // 2.5 메소드에 맵핑되어 있는 경로를 가져온다.
            String mappingMethodPath = methodAnnotation.path();
            String path = mappingControllerPath + mappingMethodPath;

            // 2.6 메소드가 URL을 처리할 수 있는지 확인한다.
            if (URL.equals(path)) {
                mappingMethod = m;
                break;
            }
        }

        // 3. 맵핑되어 있는 메서드를 실행한다.
        mappingMethod.invoke(mappingController); // 출력 결과 : "I am user create method by POST"

    }

}
4. 구성
이전 글에서 만든 커스텀 @RequestMapping 어노테이션도 컨트롤러에 적용된다.
이와 같은 주석 및 리플렉션을 사용하여 HTTP 요청 라인 및 컨트롤러 메서드를 매핑할 수 있음을 배웠습니다.
다음으로 배우고 싶은 것은 @Controller 및 @Component 주석입니다.
이 글의 주요 기능에서는 컨트롤러를 직접 초기화하는 방법을 사용했습니다.
그러나 실제 Spring Framework에서는 Annotation을 기반으로 Controller를 Bean으로 자동 등록하는 기능을 제공한다.
이러한 기능을 배우고 싶습니다.